Reaching the Enrollment Inquiry Form is easy. After your school URL, type “EnrollmentInquiryForm.htm”. This new URL will direct you to the new Enrollment Inquiry Form.
This URL also can be seen at Central Office (CMO). Go to Business > Locations and find Central Office (CMO) where you will see “Enrollment Inquiry URL”.
The new Enrollment Inquiry Form consists of five parts: introduction, parent, student, schools and finish.
1 - Introduction
The first screen is the introduction. The text is available in English and Spanish, and can be changed on any page. The inquiry agreement text is fully customizable to fit school’s needs.

How to edit inquiry agreement text , conclusion text and turn on language options
From your school menu, switch to Central Office (CMO) by clicking the button the right. Central Office (CMO) is always the first on the list of locations.
Go to Config > Enrollment inquiry form. If you want Spanish to be shown as second language, check the box to Get Inquiry in Spanish. Fill the inquiry agreement text field. The conclusion text will be shown at the completion of the process. If you would like the customized text (Inquiry agreement text and Conclusion text) to appear in English and Spanish please include both. Include TK Choose Option is for Transactional Kindergartens. Show Distance to School allows showing distance of applicants address to the school. Show Units in Metric Format displays this distance either kilometer or miles.
2 - Parent
The items in photo can be modified from Central Office (CMO) > District Code Set. The code set name is HowDidYouHearAboutUs.
With the new Enrollment Inquiry Form parents are now able to submit up to three students. State information can be modified from Central Office (CMO) > District Code Set. The code set name is StateProvince for California, AddressState for others.
3 - Students
The student screen is where student information has to be filled. If "Current academic year" is selected, the system will show the current grade levels. If “Next academic year” is selected, the system will show the grade levels defined by the school.
How to define grade levels for next academic year
The grade level must be defined by the school (not the Central Office) because each school has different grade levels for certain academic years.
Go to Student information > Applications > Configure application settings. Then click the “Add” button. Choose academic year and the grade level your school will be teaching in that academic year. Anything you define here will be shown on the inquiry form.
The two questions (checklist items) in the picture is customizable.
How to define checklist items to Enrollment Inquiry Form
If you need to add more questions to the form, go to Central Office (CMO). Config > Flex fields and add new flex field.
Entity type: This has to be Application.
Title: This is what you want to be seen on the form.
Value Type: The type of answer you require for your question.
Requirement Type: Is this field mandatory?
Upload Required: N/A
Remind Days Before: N/A
User Access Level: This should be Read/Write so that parents can see this flex field.
Admin Access Level: This should also be Read/Write.
Description: You may add a description if necessary.
4 - Schools
The red circle shows the parent’s address. The blue rectangle is where the schools are. The system automatically finds the most suitable schools for the student and lists them on the right side. Parents are able to remove inquiries for any student in this stage. For system to recognize your school on the map. You have to go Central Office (CMO).
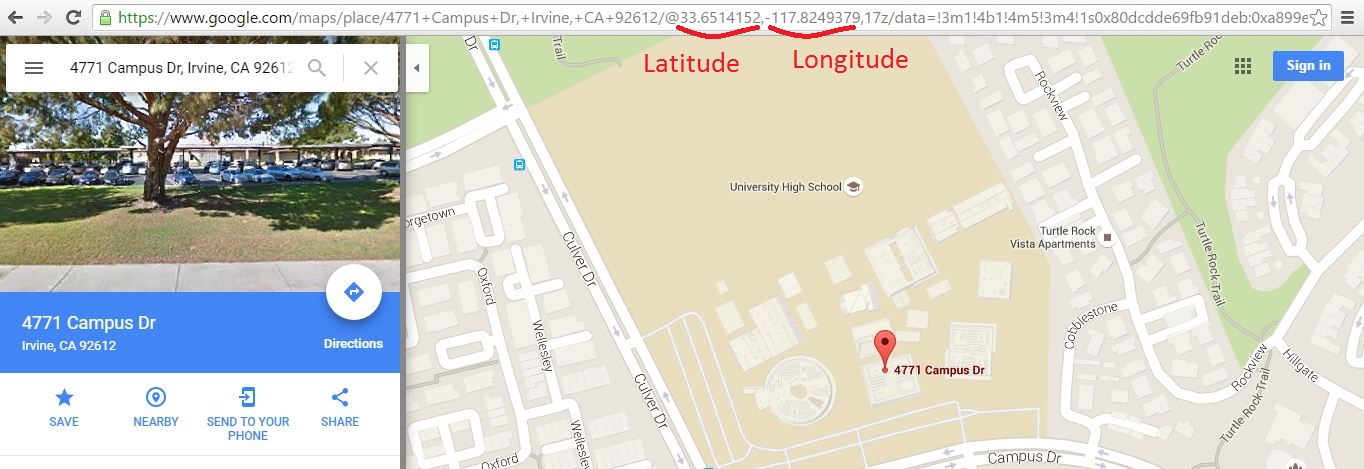
Business > Locations. Select your school and fill the required information. For latitude and longitude information, follow the directions below.

Open google map and type your school address. Copy and paste your school latitude and longitude information as it is shown in the photo. Latitude starts after @ until comma (comma is not included). Longitude starts with (-) minus until comma (comma is not included).
When your school starts to accept applications, check the box for Accepting Applications.
5 - Finish
Before submitting the Enrollment Inquiry Form, parents should review their online form carefully. Once they submit it, they cannot make changes on the form.
Once you click finish, you will receive this screen. This is called conclusion text and it is explained how to edit it in Part 1: Introduction.
After submitting, the parent will receive an email confirmation for each student’s enrollment inquiry. This email is customizable. To edit the email text go to
this knowledge base page.
Parents will receive an additional welcome email from COOLSIS that introduces how to log in and use COOLSIS.